

Navigation
For the experienced detector operator, you should be past the basics, and navigation, as such, should be 'easy'. The terminology that follows should require no explanation.
On Foot
When I go bush, I carry a compass and GPS on my person (as well as spare batteries). In fact, I usually have three GPSs on me. One in my smart phone, another a handheld unit (eg. Garmin eTrex) and finally a Personal Locator Beacon (eg. GME AccuSat PLB).
I always drop a waypoint at my campsite and, when going detecting or exploring, another waypoint where I've parked my car/return destination. (I never leave the GPS on for longer than necessary - in order to conserve battery; although I know some who use rechargeable batteries and do, I would not recommend that.) I also always note my direction of travel, usually from the terrain and sun, but also from the compass if I intend an extended excursion. Thankfully, I've only ever had to test my PLB - never use it.
On my (Android) smart phone I have several GPS apps. The most useful beingOziExplorer for Android, 'Car Finder' and 'GPS Share'.
OziExplorer is a full fledged mapping app (at least for a smart phone) and I usually have geological and navigation maps loaded for the area.
Car Finder allows me to mark the location of my car and it will 'point' me back on return.
I use GPS Share only when I want to SMS or email my current location to someone else.
Note: some apps similar to GPS Share lookup the closest address and use those GPS co-ordinates - not what the Outback Prospector wants. I usually run my phone in 'airplane mode' to prevent interference and conserve battery (in order not to flatten it and for emergency use), whilst retaining GPS capabilities.
I mark my return destination in my handheld GPS as well as either OziExplorer or Car Finder Multiple devices, in case one fails. I'm not always this paranoid and it does depend on the environment and how far I might travel. If you haven't marked your location and decide maybe you should have or feel a bit dis-oriented (lost), then mark where you are.
I avoid using GPS to return to my car - preferring to return via my instincts, terrain, sun or compass. If I'm quite a distance from the car and want a more accurate return path (shorter) or when I'm navigationally challenged, then I use my GPS.
When using my GPS to return, I usually take a bearing from the GPS (via the Waypoint Goto function on a held held device or the Nearest Waypoint List in OziExplorer) then revert to my compass, keeping the GPS turned off. Also, using a compass is a lot quicker than repeatedly firing up the GPS.
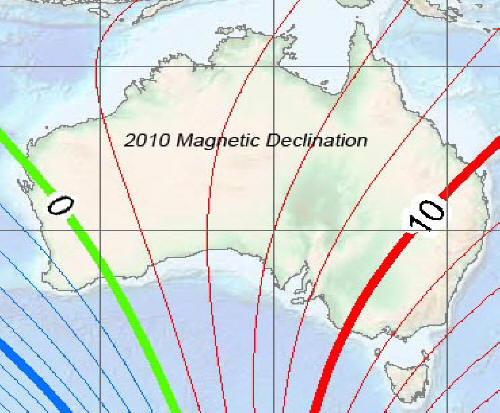
Don't forget to allow for magnetic declination, refer above. (For example, around Kalgoorlie, WA, the declination is about 1 degrees; around Ballarat, VIC, the declination is almost +11 degrees. That is, around Ballarat, VIC, True North will be around 349 magnetic degrees.) Most GPS units will provide True or Magnetic North readings. Know what your GPS is set to. When you read a GPS bearing, it should display a 'T' or 'M' North indicator. For the above method it is easiest to simply configure your GPSs to provide Magnetic North readings. Alternatively some compasses provide a declination adjustment (to align the compass' north reading to True North). For working with maps, a True North GPS configuration is probably more appropriate. Also, when working with maps, be aware of 'Grid North' that deviates from True North when the earth's curved surface is projected onto a flat map.
 Although it is not necessary, in order to navigate (in open country), as above, you may want a 'sighting compass'. A sighting compass allows you to take an accurate bearing and view the destination (eg. a tree) at the same time. This allows a more accurate course to be taken. (Based on a 10 degree error difference between a sighting verses a non-sighting compass reading, an error of about 170 meters can be expected over 1 kilometre. Alternatively, taking more frequent GPS bearing readings, whilst trekking to the destination, will alleviate this.)
Normally when you take a bearing you cannot see the final destination so you must target an intermediate destination, a tree, as in the previous example, then walk there by any squiggly path and repeat the process until you get to your final destination. Because any errors may be compounded, taking accurate readings with a sighting compass will help minimise this.
When using a compass always take readings away from power lines and magnetic objects, such as, cars, speakers, spectacles and local mineralisation (see Caution below).
Points of caution:
- When you target an intermediate destination, a tree, for example, that looks tall or distinct from a distance can be obscured or become non-distinct as you approach it or view it from a different angle!
- As you approach your final destination, take care not to overshoot it. Use your GPS intermittently to correct your bearing and review the remaining distance.
- Never rely on mechanical or electrical devices for field navigation. Always keep track of the sun and time, local features (eg. terrain, streams) and landmarks, and look backwards to observe your return path.
- When using a compass, always check that the polarity has not been reversed (you know where the sun is, right?). It is not unusual for north to point south! This occurs, for example, when it is stored next to another magnet, such as the speaker for your detector; or even a knife. Have a look at http://www.silvacompass.com/detail.aspx?id=76#3. If this happens you can fix it by leaving it next to another correctly aligned magnet or if you can stop the needle from spinning, try stroking the needle with another magnet.
- Learn how to determine south (or north) from the stars (http://en.wikipedia.org/wiki/Celestial_pole#Method_one:_The_Southern_Cross). It's not difficult and might just save your butt.
- Keep any electronic devices where they will not interfere with your compass or detector, and are not affected by humidity. Keeping a cell phone, for example, in your hot, sweaty shirt pocket for an extended period will cause it to malfunction. I keep my phone in a cloth/leather pouch available 'everywhere' rather then in my pocket.
- Beware of navigating via 'mud maps'. They are called mud maps for a reason.
- For the Outback Prospector, in particular, beware of any strong localised mineralisation - maintain an expectation of where north is and move away from the local mineralisation (usually an ironstone or magnetite reef) when you notice north is not where you expect it, the compass needle swings with a local fixation, and/or the compass needle dips more than normally. (Try moving the compass around horizontally - left, right, forwards and back, etc. The needle should point consistently in one direction - north. Also try moving it around your body looking for local anomalies, eg, cell phone in your pocket.)
If you remain uncertain, mark your sighting position accurately (location of compass) and take a sighting to a nearby (at least tens of meters away, maybe more) point that is clearly free of interference. Walk there and take a reverse sighting to your original sighting point. Your original sighting measurement and reverse sighting measurement should be the same.
Purchasing and Testing a compass
In your car
Pssst! Let me tell you a secret....If you're not using OziExplorer (or similar) for prospecting in the bush, you're behind the 8-ball - good luck to you!
Apart from helping you to navigate the major highways and byways, OziExplorer (or similar) can be invaluable for prospecting. Have a look at the OziExplorer 'Maps' page for information on where to get various maps. I won't tell you what maps I use because that's a trade secret, however, you should have maps that cover all the Australian National and State highways, regional centres and more detailed maps for areas of specific interest. Apart from 'navigational' maps, you will also want geological and historic maps and maybe satellite images.
Satellite images/mapping can be obtained using OziExplorer in conjunction with Google Earth. Have a look at http://www.oziexplorer3.com/eng/ge.html.
OziExplorer also has an 'Internet Map' capability. Have a look at http://www.oziexplorer3.com/eng/osm.html. You will need Internet connectivity to set this up but OziExplorer will cache the images so you don't need Internet whilst driving.
There is also a program called Mobile Atlas Creator that enables you to create OziExplorer (and other) maps from online mapping sources.
Points of caution:
- Never rely on mechanical or electrical devices for field navigation. Always keep track of the sun and time, local features (eg. terrain, streams) and landmarks, and look backwards to observe your return path.
- When plotting your course, that is, how to get from Point A to Point B, the most obvious, direct path is not always the best. Roads shown on maps as 'major' can fall into disrepair. Always watch out for alternate sign posts, and warnings; and take note of prevailing weather conditions (a relatively light shower can turn some roads impassable). If you travel remote country roads, that are new to you, often enough, you will come unstuck (as in, end up where you don't want to be). Be prepared! Carry extra fuel, water, tyres, etc.