
Purchasing & Testing a Compass

Purchasing a compass
Characteristics to look for (most retail sales assistants will not provide this advice):
- A sighting compass is recommended; this is more important as navigational distances, in open country, increase. (A non-sighting compass can be used for sighting but with less accuracy.)
- How easily and accurately can a sighting (reading or bearing) be taken? How easily can you read a bearing and sight a target simultaneously?
- How big is the compass? A 35mm needle length/diameter is minimum.
- For greatest accuracy and precision - observe how stable the needle is:
- Does the needle stick when the base is tilted (within reason)? Similarly does the base need to be tilted to enable the needle to swivel freely? (It is normal for the needle to dip slightly. This is caused by the Magnetic Inclination. Only near the (magnetic) equator should an unbalanced needle be perfectly level. All good quality compasses are counter-balanced for where they will be used. (Suunto balance their compasses for use in 5 zones (Australia is Zone 5, North America, Europe and Russia are Zone 1).
- Does the needle point north consistently and accurately when the base is twisted? Place the compass on a non-magnetic horizontal surface and twist it clockwise and counter-clockwise. It should behave like a match floating in the middle of a bowl of water that you twist.
- How quickly does the needle settle and accurately point north? Ensure it does not 'stick' when settling down to the last couple of degrees. A good compass will have a jewelled pivot bearing. It should settle in less than 3 seconds with no 'assistance'.
- How stable is the reading when held still? You don't want it shaking around when taking a reading. A fluid filled chamber is usually used to dampen any movement.
- Does the needle stick when the base is tilted (within reason)? Similarly does the base need to be tilted to enable the needle to swivel freely? (It is normal for the needle to dip slightly. This is caused by the Magnetic Inclination. Only near the (magnetic) equator should an unbalanced needle be perfectly level. All good quality compasses are counter-balanced for where they will be used. (Suunto balance their compasses for use in 5 zones (Australia is Zone 5, North America, Europe and Russia are Zone 1).
- Ensure there is a secure lanyard attachment (and lanyard).
- A needle based compass should have a bezel (a twisting compass dial) that is firm but will not twist unintentionally.
- How fine are the compass dial markings? 10 degree markings are minimum. 2 degrees is preferable. The fineness of the markings are indicative of quality, although the graduations do not necessarily reflect level of accuracy.
- Does the optional fluid surrounding the needle contain bubbles? If so it may be faulty and might interfere with needle movement. Small bubbles (less than 5mm) may be caused by temperature or atmospheric pressure and may be okay (not caused by a leak) provided they do not interfere with compass needle.
- If planning to navigate with paper maps you will probably also want ruler and scale markings on the baseplate.
- Ensure the compass dial is marked 0-360 degrees (Azimuth Graduations). (Some are marked 0-90, 90-0, etc - Quadrant Graduations. Others are marked 0-6400 - Military Graduations.)
- Take care if considering an electronic compass. A quality electronic compass will cost more than a comparable magnetic compass, however, it may also provide useful additional features, such as, True North and memory for sightings. On the downside, they require frequent calibration to maintain accuracy, a supply of batteries especially if transacting (walking to) a bearing and will usually be more sensitive to harsh environments.
Most compasses from 'known' manufacturers (eg. Silva.se or Silvacompass.com, or Suunto) will easily meet all the above requirements and should not cost too much, although there may be a surprising price difference between their entry level and top level devices; especially in respect to additional features (or apparent, lack of)!
Once you've decided on what features you require then look for build quality - look at the underside, if possible, and observe manufacturing and assembly techniques. Snap-fit manufacturing with minimal parts count, indicate lower cost, lower quality; whereas a higher parts count with jewel bearings, southern hemisphere or zone balance, and metal sub-components indicate higher cost, higher quality.
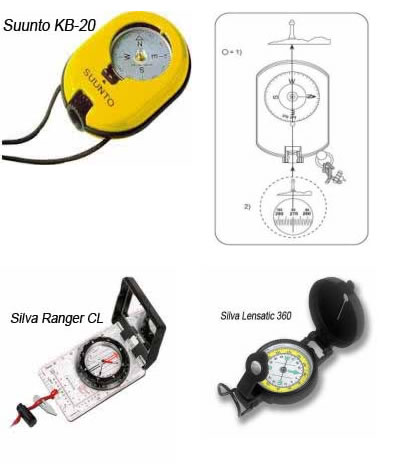
Good compasses available from most outdoor retail chains (like, Aussie Disposals, Ray's Outdoors and Paddy Pallin) are more than adequate; however, if you want a professional quality compass, try Prospectors or Melbourne Map Centre. Here are a few of excellent compasses:
Should I get a needle or dial compass?
When taking a sighting with a needle compass, the mirror is used to observe and align the needle's north with the bezel's north (or align the bezel's north with the needle's north; depending on whether you know the bearing or want to determine the bearing to a target) before a reading can be taken off the bezel's markings (see picture of mirror compass near top of page). This requires two simultaneous observations before a reading can be made.
When taking a sighting with a dial compass, the bearing can be read directly off the dial as the sighting is made (see diagram above, next to the Suunto KB-20 picture). This requires a single observation for a reading to be made.
Obviously, taking a reading off a dial compass is a lot easier and more accurate. However, when transacting a bearing, that is, walking in a particular direction, it is easier to keep a relatively large needle aligned to a north marker than to read the markings off a dial compass (most dial compasses do not have a bezel with a large north indicator, although the Silva Lensatic does have a fine indicator) - hence the popularity of needle based compasses in orienteering. (For working with paper maps, baseplate based needle compasses are able to measure map angles and the like - the Suunto MC-2 Global is recommended.)
Having said that, for most Outback Prospectors, walking in a specific direction for any reasonable distance is not going to work. Hence navigation is more likely to be via intermediate sighted destinations and squiggly paths. Consequently, for easy of use, a dial compass such as the Silva Lensatic 360, the Suunto KB-14 or the Suunto KB-20 is recommended. (Note that the KB-14 has a metal body that some prospectors may want to avoid.)
Testing your compass' accuracy and/or your sighting skills
It's easy enough to read off a sighting with your compass but how do you know it's correct or at least how accurate is it? There are several ways to do this but I use the following:
The basic idea is to use Google Earth to obtain the GPS location of a well defined and visible local land mark, at least one kilometre away from where you will take the sighting; a TV tower usually works well. You will also use Google Earth to get the GPS location of where you will take the sighting from.
The target to be sighted must be visible from the sighting location and the sighting location must be suitable for taking a sighting; specifically, it must be free of any local magnetic interference. You then calculate the (true north) bearing then adjust for the magnetic declination. The result of this calculation is what you should get when you take your sighting.
Note that you do not need to use Google Earth to do this. If you can get an accurate GPS location from a map, then that may be adequate. Bear in mind that you should use the same method for both the target and sighting locations.
If you use a GPS to actually visit and mark the target and sighting locations, you should do so within a short a time frame as possible, in order to minimise any GPS positioning error; or increase the distance between sighting and target locations. Also if taking a GPS position, a GPS device that provides an Averaged Position, is probably more accurate but you will need to give it time to obtain a reasonable average.
The objective is to get an accurate GPS position for both target and sighting locations.
- Get a GPS location of a target landmark via Google Earth. This must be at least one kilometre away from your sighting location. In Google Earth zoom-in as far as you can for the most accurate GPS co-ordinate. If targeting, for example a TV Tower, position the mouse cursor at the base of the tower (usually the Google Earth image will be at an angle, not from directly overhead). The GPS co-ordinate appears on the bottom of the screen.
- Get the GPS location of the sighting location following the same method as above.
- Having obtained accurate GPS co-ordinates for both your Sighting and Target Locations; Calculate the bearing from the sighting location to the target location. Try Googling for an online calculation with 'gps route bearing calculate' or use this calculator: http://www.fcc.gov/encyclopedia/distance-and-azimuths-between-two-sets-coordinates. On Android try Lat Long Calc.
- If your calculator provides a True North Bearing, such as the calculator above, then try Googling on 'magnetic declination calculate' for a magnetic declination calculator, or use this: http://www.magnetic-declination.com/
- Calculate your Magnetic North Bearing from the above then go to your sighting location and try it out. To do this accurately you may want to 'mount' your compass on a fixture but you must ensure that the mount does not affect the magnetic compass' reading. Also, ensure you do this well away from any large metal objects, a building, concrete driveway, or underground/overhead utilities for example.
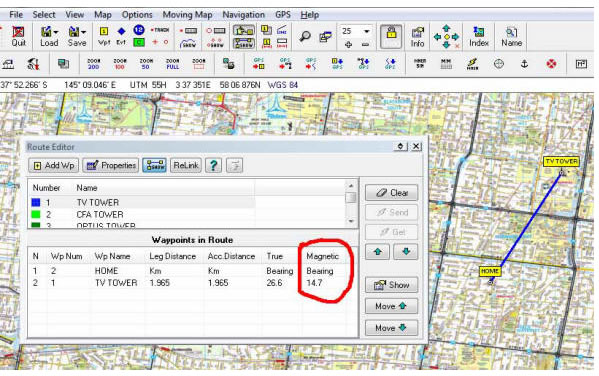
Note: If you have OziExplorer, you can plot waypoints for your Target and Sighting Locations than use the 'View/Route Editor' (and 'Add Wp' button) to create a Route with the two waypoints. The 'Waypoints in Route' table will then display the True and Magnetic Bearings (on the right hand side). Refer picture below.
Also note that the earth's magnetic declination varies continuously and algorithms used to calculate it also vary between programs (eg. OziExplorer and Lat Long Calc). Use http://www.magnetic-declination.com/ for additional accuracy.